
You have arrived at another installment of the Building a Better Beauty Blog series on my blog Shalunya & Boyet. The BBBB series is a collaboration with Laurie from the The Makeup Squid. She has written some excellent articles on blog content and organization. You can find a list of all the posts in this series by clicking the BBBB tab just under the header.
FINE PRINT: Beauty bloggers come from all walks of life and have varying degrees of computer knowledge. There is no way to write a single post for all of the different levels of knowledge. In order to provide everyone with the most detailed explanation possible, this post is written as if I am instructing a brand new blogger about this element of blog design. After all, if a blogger is seeking information this post would be of no benefit to them if I left them with more questions than answers. If you have some knowledge of blog design feel free to skim this post and use it as pictorial instructions as it is possible that I could cover an aspect of design that you had not considered before. If you are extremely familiar with this topic please feel free to leave me a comment so that I may learn from your experience.

Today's post is going to be how to create your own Grab Button so that you can swap buttons with other bloggers. First let's discuss shape. Grab Buttons should be square so that they are easy to create and easy to resize. It should be a clear image or design that speaks to the nature of your blog. Please remember that the image you use should be an image or design that does not have any copyright conflicts. If you have grabbed an image from Google please remember that you could end up with a lengthy court battle on your hands should the owner of that image choose to take legal action. The background image of my blog, grab button, and other social media outlets is an image I took with my own camera while I was in the Philippines. Therefore, I can rest assured that my image is safe to use.
First you are going to need a photo editor. I use Photoshop a lot; but not everyone has or wants to use Photoshop as it's a heavy program an it's not exactly user friendly. I also use Fotor, a free online photo editor, a fair amount as it has some great filters. Pixlr, FotoFlexer, Lunapic, Picnik and plenty more are also great online photo editors. You should become comfortable with one and use it regularly in order to become familiar with it. For demonstration purposes I am going to utilize Fotor since it is what I am most familiar with. Most photo editing programs are similar but some have different features. Feel free to use whichever program you are most comfortable with.

If you are going to design something feel free to download either of the blank 200x200 squares as a template with which to start your Grab Button. The first block has a transparent or see through background and must be saved as either a .gif or a .png in order to keep the background transparent. The second template has a white background and can be saved as a .jpg
| Grab Button Blank Transparent |
| Grab Button Blank White |
Whether you use an image or a blank template you will need to open the image or template in Fotor. With an photo image the first thing you will need to do is to crop it into the proper shape. Ensure that your are on the Photo Editing tab with the paintbrush on it, next to the blue arrow. Next you will want to ensure you are on the Basic Edits selection on the left side which also has a paintbrush which is next to the red arrow. Then open the Crop selection next to the green arrow.

Ensure that you have chosen Square so that the crop tool can crop a perfect square for you.

Next is when you get to decide if you want to show a small portion of your image.

Or a larger portion of your image. Once you have made that choice, click the Apply button.

After you have cropped your image to a square shape you will want to Resize the image to the correct size which should be 200x200. Some websites will recommend that Grab Buttons should be made 125x125. The problem I have with that is if a blogger should choose to enlarge your button some clarity may be lost. Whereas if you create a larger image and it needs to be downsized the image will retain it's crisp quality.

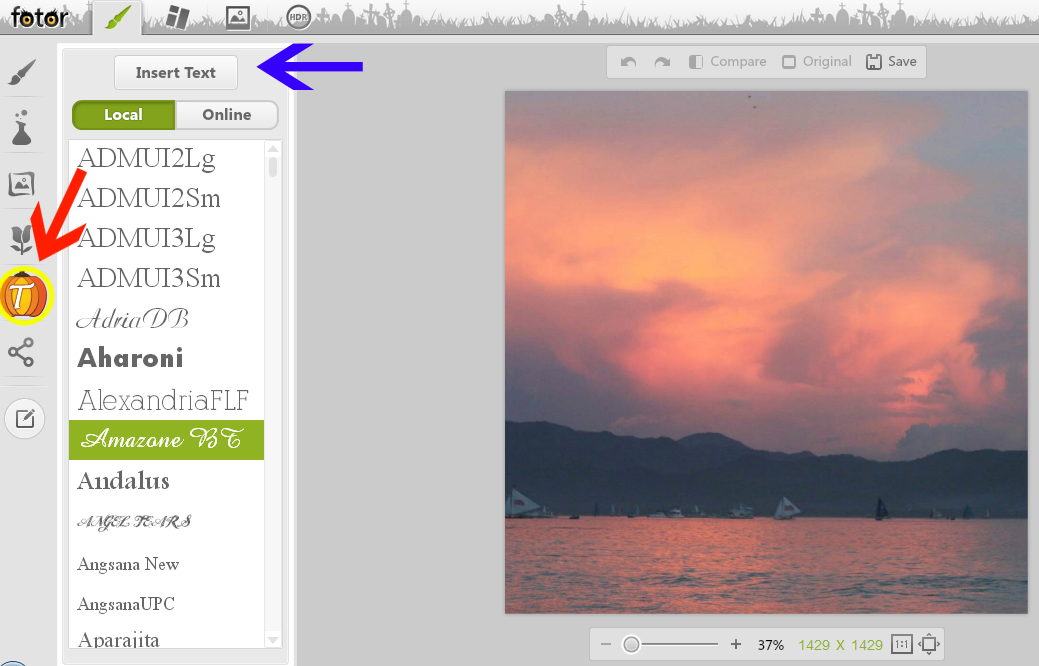
Next you will want to apply your desired text to the image by clicking the Text option represented by the T next to the red arrow. After that you will scroll through your font options and choose the one you prefer. Next you will click the Insert Text Button
Click inside the 'Enter Text Here' and enter whatever verbiage you would like to have displayed on your Grab Button.

Once you have the Grab Button Designed the way you would like click the Share selection circled in blue on the left side of your screen. Click Apply when prompted by Fotor.

After you have the Grab Button saved on your computer. You will need to upload it to a photo sharing site. Again their are several options such as Photobucket, Picasa Web Album, SkyDrive, Shutterfly, Flickr and more. I prefer Flickr as it gives you a Terabyte of storage space which is a lot! Once you get signed into Flickr click upload circled in blue in the top center of your screen.

Next you will choose photos that you would like to upload. You could also pick, click and drag the image from where you are storing it, probably in your photos folder, to the Flickr screen and drop the photo.

On the next screen you will need to select the photos you would like to upload and then click the blue button in the top right corner of your screen.

Once they have uploaded you will need to determine the URL for sharing the image. In Flickr it is a small symbol in the bottom right corner which I have circled in yellow for you.

You will see a small box popup and you will want to ensure that you are on the Grab the HTML/BBCode tab. Click inside the box with the text and then hit CTRL + A for all. Then click CTRL + C for copy. However, you will not need all of the code you just copied. You will only need a portion of that code. The portion that you need is highlighted in yellow.
<a href="http://www.flickr.com/photos/78727929@N06/10562155453/" title="Fotor01029151413 by shalunyya721, on Flickr"><img src="http://farm8.staticflickr.com/7308/10562155453_35185a7673_o.jpg" width="200" height="200" alt="Fotor01029151413"></a>
Next you will go to Grab My Button Code Generator from My Cool Realm and enter the following information. You will use the information specific to your blog and your image below.
Your website/Blog Title: THE NAME OF YOUR BLOG
Your website/Blog URL: http://YOURBLOG.blogspot.com
Your image URL: http://farm8.staticflickr.com/7308/10562155453_35185a7673_o.jpg

After you have entered those three things you will click on the Preview button.

A white box will pop up displaying what your Grab Button image with code box underneath will look like. If your image does not show ensure that you are using only the yellow highlighted portion of the code from Flickr.

Once you are satisfied with the image click the green Get Code box.

Once again you will want to click inside the code box. Select all of the text with CTRL + A for all and then copy with CTRL + C. As we learned in Grab Buttons for Your Sidebar you will then Add a Gadget in your side bar, select HTML/Java Script. Paste that code into the HTML box with CTRL + V. After you click Save you can view your new Grab Button on your side bar.
Thank you again for sitting through another long episode of BBBB. I hope you have enjoyed building your own Grab Button and installing it on your blog. If you have any questions feel free to contact me on any of my social media outlets. You can find all of my social media links under our about me photo at the top right of my blog. I hope everyone is have a wonderful day and a beautiful life. Peace and love be with all of you.
No comments:
Post a Comment
I'd love to hear from you.